Restoration document:
 I've been restoring old houses in Minneapolis since 1976,
with an interest in the permanence of the restoration.
I've done 100 percent paint removal and recoating on scores of
large houses, using heat guns. I use only Ben Moore Element
Guard or Sherwin Williams Duration. I also perform the
carpentry tasks.
The photo above and below is my standard fare on exteriors.
  I've been restoring old houses in Minneapolis since 1976,
  with an interest in the permanence of the restoration.
  I've done 100 percent paint removal and recoating on scores of
  large houses, using heat guns.  I use only Ben Moore Element
  Guard or Sherwin Williams Duration.  I also perform the
  carpentry tasks.

  The photo above and below is my standard fare on exteriors.

Part I

Tools and techniques for using heat to completely remove
paint from siding and trim.

     1. Ground Cover
     2. Scaffolding
     3. Face Mask and Clothing
     4. Surface Preparation - Heat Guns
     5. Pro-Prep Scrapers
     6. Setting Nails
     7. Hand Sanding

Part II

Materials and techniques for coating bare wood.

     8. Soaker Coat
     9. Caulk
    10. Acrylic Primer
    11. Finish Coats
    12. Encapsulation
    13. Overpainting


Part I

Paint removal
1. Ground Cover
Protecting the health of your customers, their neighbors,
their pets and wildlife is the motivation for containing
lead paint chips and dust.
Cover the ground with 4 mil plastic sheeting, cutting
and fitting tightly around bushes. Hang nylon tarps over
bushes, and remove these each night. Use plenty of ballast
to secure the ground cover. After paint removal, slice it
into manageable sections and roll it up.
Vacuum up any remaining chips using a wide diameter
vacuum hose with a tapered attachment. This will
prevent clogging the hose with chips and twigs.
2. Scaffolding
You'll be far more productive working off a plank
than off a ladder. Every house scaffolds differently,
and a lot of thought must be given as to exactly
how to implement it. Whether you rent or own your
scaffolding, you'll find adjustable stands and sidearms
for planks to be indispensable accessories.
Scaffolding will also provide a means for hanging
tarps to help direct chips and dust downwards to the
ground cover.
3. Face mask and clothing
The motivation here is to protect yourself with a mask,
and to protect people and pets you come in contact with
by changing clothes at the jobsite.
I've been using charcoal canister breathing filters.
These seem to be effective, since lead has a definite
odor when melting old leaded paint using heat guns,
and these filters block out all such odor. There
is a filter called ULPA (Ultra Low Penetration Air)
which apparently is the ultimate protection against
lead fumes, but don't look for it at your paint store.
Eyes can also absorb lead fumes, so you might want to
consider full face protection.
Beginning in 2022, I've been using a mask with no
filter. With duct tape, I've attached shop vac hose
to a mask that originally used charcoal cannisters.
With the ends of the hoses dangling well below the
heat guns (and of course lead fumes rise along
with the heat), I'm breathing good air.
Hopefully, you'll do a better job than I do at
forming a good seal to your face. Being clean-
shaven and using Vaseline as a sealant is key:
 4. The heat gun
 I've carefully measured stripping progress using single,
double and triple heat guns, and consistently find that
double heat guns strip at exactly twice the rate of single
guns, and triple heat guns strip at exactly triple the rate
of single guns.
Triple guns work well for siding. I buy the thirty-dollar
guns at Menards or Home Depot, remove the plastic casing
from two of them, and through the use of electrical or
duct tape, achieve the configuration in the photo. By
doing this and by fastening the cords at your waist, you
will reduce the weight to exactly that of two heat guns.
A very important modification of the nozzle is to make about
a dozen snips and flare out the resulting sections as shown
in the photo. This will not only spread the heat out more
uniformly on the surface to be stripped, it will also allow
you to hold the nozzles right up against the surface and
keep them there. The biggest mistake workers make when
using heat guns is that they tend to keep backing the gun
away from the surface. The nozzles should rest on the
surface 100 percent of the time you are stripping.
Work in long strips. Heat spreads through the paint film
by conduction. If you work in short strips, you lose this
advantage of preheating. You also lose this advantage
every time you back the gun off the surface.
Double heat guns work well for trim and siding. Simply tape
two guns together.
Each heat gun requires a separate electrical circuit. Have
lots of cord on hand. Each 1000 watt gun costs fifteen cents
per hour to run. Thus, a triple gun costs less than four
dollars per day to operate.
Fire hazards
Heat stripping does not need to be a risky procedure. The
most important thing is to carefully caulk all cracks,
holes and gaps between boards before using heat. Carefully
inspect under each siding board as well as all other boards
for gaps, holes or cracks.
Hidden fires in walls, eaves and under shingles start
in two ways:
1. Heat flowing into cracks, holes or gaps.
There is very dry wood or even dry wood dust in
walls, eaves, and at the roof line. This can
begin to smolder without your knowledge and erupt
into flames after you've gone home.
2. Sparks emitted from heat gun nozzles drift into
cracks, holes or gaps.
Bits of paint shavings fall into the nozzles and
come out as sparks, particularly when melting on
the underside of a horizontal surface, such as a
soffit.
You can virtually eliminate the risk of fire by using caulk
to fill in any cracks, holes or gaps prior to heat stripping.
This is my standard procedure. Never aim your gun at or below
any crack, hole or gap.
One place that cannot be caulked is where the roof shingles
meet the fascia board. Stay well away from the roof line
when heat stripping. Dry scrape the upper couple inches of
the fascia board.
Whenever in doubt, turn the guns down to the low heat setting
or back them well away from the surface and use a little extra
scraping muscle.
Keep a water hose with nozzle attachment, a hammer and a
pry bar near you on your scaffolding. The hose should be left
on at the spicket. (A small fire extinguisher is very handy.)
In the event of a fire, do not pry up any board until you have
the hose in hand. Prying up a board gives the fire a burst of
oxygen and sudden life, causing it to spread rapidly.
4.5 Infrared heat (radiant heat) for paint removal
Another possibility to consider:
A lightweight infrared heater using just one electrical
circuit strips paint nearly as fast as my triple circuit
heat guns, provided there is reasonable continuity of the
paint film to be stripped. I began using infrared heat
occasionally, beginning in 2004, after being alerted to it by
a reader of this website. It's been a nice compliment to
my old standby conventional heat guns. The drawback is that
there is a slow initial heat transfer to the substrate,
meaning it is all the more important to keep the tool on
the substrate continuously.
I haven't seen evidence of any fire hazard with it (but
still use caution), and little or no need of a face mask.
Why no one thought of this for paint removal 50 years ago is
hard to understand. The technology is at least that old.
There is a commercial model available, but I didn't want
to spend $465 on the heavy commercial model when I could
make a lightweight model for about $50 in materials and
30 minutes of my time. I converted an old infrared room heater
for which I had paid about $50 into a very lightweight paint
remover. The replacement tubes are only $10 (and I have yet to
burn out a tube).
My tool works as well as the commercial model. The working
parts in my tool are the same as in the commercial model -
two quartz tubes.
Go to wbmarvin.com for a listing of available infrared
heaters and the $10 replacement tubes. The model 5460
Steam 'n Heat at $79.95 looks like the current version of the
old Marvin heater I had used to make my paint remover. You
might also check at Walmart or search online for inexpensive
infrared quartz room heaters.
Make your own infrared paint remover and save the weight and
the high cost of the commercial model. The commercial model
(Silent Paint Remover) weighs 4 lb 3 oz. My infrared paint
remover weighs just 1 lb 12 oz. This includes the 12 oz
clamp being used for the handle. A lighter handle, such as
a simple L-shaped piece of wood will bring the weight down
to just 1 lb 1 oz. Having stripped paint for a living for
the past 50 years using heat guns, I can assure you that
you'll appreciate this weight reduction and increased
productivity.
I've carefully measured stripping progress using single,
double and triple heat guns, and consistently find that
double heat guns strip at exactly twice the rate of single
guns, and triple heat guns strip at exactly triple the rate
of single guns.
Triple guns work well for siding. I buy the thirty-dollar
guns at Menards or Home Depot, remove the plastic casing
from two of them, and through the use of electrical or
duct tape, achieve the configuration in the photo. By
doing this and by fastening the cords at your waist, you
will reduce the weight to exactly that of two heat guns.
A very important modification of the nozzle is to make about
a dozen snips and flare out the resulting sections as shown
in the photo. This will not only spread the heat out more
uniformly on the surface to be stripped, it will also allow
you to hold the nozzles right up against the surface and
keep them there. The biggest mistake workers make when
using heat guns is that they tend to keep backing the gun
away from the surface. The nozzles should rest on the
surface 100 percent of the time you are stripping.
Work in long strips. Heat spreads through the paint film
by conduction. If you work in short strips, you lose this
advantage of preheating. You also lose this advantage
every time you back the gun off the surface.
Double heat guns work well for trim and siding. Simply tape
two guns together.
Each heat gun requires a separate electrical circuit. Have
lots of cord on hand. Each 1000 watt gun costs fifteen cents
per hour to run. Thus, a triple gun costs less than four
dollars per day to operate.
Fire hazards
Heat stripping does not need to be a risky procedure. The
most important thing is to carefully caulk all cracks,
holes and gaps between boards before using heat. Carefully
inspect under each siding board as well as all other boards
for gaps, holes or cracks.
Hidden fires in walls, eaves and under shingles start
in two ways:
1. Heat flowing into cracks, holes or gaps.
There is very dry wood or even dry wood dust in
walls, eaves, and at the roof line. This can
begin to smolder without your knowledge and erupt
into flames after you've gone home.
2. Sparks emitted from heat gun nozzles drift into
cracks, holes or gaps.
Bits of paint shavings fall into the nozzles and
come out as sparks, particularly when melting on
the underside of a horizontal surface, such as a
soffit.
You can virtually eliminate the risk of fire by using caulk
to fill in any cracks, holes or gaps prior to heat stripping.
This is my standard procedure. Never aim your gun at or below
any crack, hole or gap.
One place that cannot be caulked is where the roof shingles
meet the fascia board. Stay well away from the roof line
when heat stripping. Dry scrape the upper couple inches of
the fascia board.
Whenever in doubt, turn the guns down to the low heat setting
or back them well away from the surface and use a little extra
scraping muscle.
Keep a water hose with nozzle attachment, a hammer and a
pry bar near you on your scaffolding. The hose should be left
on at the spicket. (A small fire extinguisher is very handy.)
In the event of a fire, do not pry up any board until you have
the hose in hand. Prying up a board gives the fire a burst of
oxygen and sudden life, causing it to spread rapidly.
4.5 Infrared heat (radiant heat) for paint removal
Another possibility to consider:
A lightweight infrared heater using just one electrical
circuit strips paint nearly as fast as my triple circuit
heat guns, provided there is reasonable continuity of the
paint film to be stripped. I began using infrared heat
occasionally, beginning in 2004, after being alerted to it by
a reader of this website. It's been a nice compliment to
my old standby conventional heat guns. The drawback is that
there is a slow initial heat transfer to the substrate,
meaning it is all the more important to keep the tool on
the substrate continuously.
I haven't seen evidence of any fire hazard with it (but
still use caution), and little or no need of a face mask.
Why no one thought of this for paint removal 50 years ago is
hard to understand. The technology is at least that old.
There is a commercial model available, but I didn't want
to spend $465 on the heavy commercial model when I could
make a lightweight model for about $50 in materials and
30 minutes of my time. I converted an old infrared room heater
for which I had paid about $50 into a very lightweight paint
remover. The replacement tubes are only $10 (and I have yet to
burn out a tube).
My tool works as well as the commercial model. The working
parts in my tool are the same as in the commercial model -
two quartz tubes.
Go to wbmarvin.com for a listing of available infrared
heaters and the $10 replacement tubes. The model 5460
Steam 'n Heat at $79.95 looks like the current version of the
old Marvin heater I had used to make my paint remover. You
might also check at Walmart or search online for inexpensive
infrared quartz room heaters.
Make your own infrared paint remover and save the weight and
the high cost of the commercial model. The commercial model
(Silent Paint Remover) weighs 4 lb 3 oz. My infrared paint
remover weighs just 1 lb 12 oz. This includes the 12 oz
clamp being used for the handle. A lighter handle, such as
a simple L-shaped piece of wood will bring the weight down
to just 1 lb 1 oz. Having stripped paint for a living for
the past 50 years using heat guns, I can assure you that
you'll appreciate this weight reduction and increased
productivity.

 I refolded the aluminum reflector so that the tubes would
be spaced 2 1/2 inches apart, which is the average spacing
of narrow lap siding.
I also made a single tube model for doing narrow architectural
detail.
Neither the aluminum reflector or the clamp get too warm
to cause any problem. I casually lay the tool down facing
up and running (meaning plugged in - no switch needed) when
I'm not using it. You can lay it down on any surface such
as a wood plank, the ground, or a nylon tarp.
5. Pro-Prep scrapers
I refolded the aluminum reflector so that the tubes would
be spaced 2 1/2 inches apart, which is the average spacing
of narrow lap siding.
I also made a single tube model for doing narrow architectural
detail.
Neither the aluminum reflector or the clamp get too warm
to cause any problem. I casually lay the tool down facing
up and running (meaning plugged in - no switch needed) when
I'm not using it. You can lay it down on any surface such
as a wood plank, the ground, or a nylon tarp.
5. Pro-Prep scrapers
 These scrapers will not only greatly boost your heat stripping
output, they will be your partner in all kinds of dry scraping
endeavors, from high speed outdoor dry paint removal to fine
interior wood refinishing projects, including furniture.
Proper sharpening and use of these scrapers is at the heart
of indoor and outdoor refinishing projects. The blades shown
above will be your primary ones for outdoor work (and most
indoor work). For heat stripping, I use the small sized
handles even with the large sized blades. This gives greater
clearance for shavings.
Buy large coarse grade files by the half-dozen, or by the
dozen if you have a helper. A sharp file is the only tool
to use to sharpen your scraper. As soon as filing becomes
a bit of a struggle, throw the file away.
These scrapers will not only greatly boost your heat stripping
output, they will be your partner in all kinds of dry scraping
endeavors, from high speed outdoor dry paint removal to fine
interior wood refinishing projects, including furniture.
Proper sharpening and use of these scrapers is at the heart
of indoor and outdoor refinishing projects. The blades shown
above will be your primary ones for outdoor work (and most
indoor work). For heat stripping, I use the small sized
handles even with the large sized blades. This gives greater
clearance for shavings.
Buy large coarse grade files by the half-dozen, or by the
dozen if you have a helper. A sharp file is the only tool
to use to sharpen your scraper. As soon as filing becomes
a bit of a struggle, throw the file away.
 Place the scraper on a firm surface and file into the blade
edge. File at a 45 degree angle. Slightly round the corners
of the large flat blades as shown in the drawing; and for
dry scraping, very slightly arc the entire edge as shown.
Rounding the corners will help keep you from making gouge lines
on the surface you're scraping. Arcing an edge will give you
better bite for dry scraping.
Keep your file with you at all times. Dry scraping necessitates
resharpening as often as every half minute. Heat scraping
necessitates resharpening about every five minutes.
Use a variety of motions with your scraper - towards the guns
with the grain, away from the guns with the grain, perpendicular
to the grain, and diagonal to the grain.
Take your time and let the heat do most of the work, or
you'll end up with gouges on your wood surfaces. Clean up
all residue as you go along.
Heat assisted scraping is usually the best approach even
when just spot scraping. It's gentler on the wood and will
allow you to feather the paint as you go along.
Retire your blade as soon as it becomes a bit of a chore
to sharpen it. (You get to the thicker part of the blade
as you sharpen it.) The cost of the files and scraper
blades is small compared to the cost of struggling with
expended files and blades.
Place the scraper on a firm surface and file into the blade
edge. File at a 45 degree angle. Slightly round the corners
of the large flat blades as shown in the drawing; and for
dry scraping, very slightly arc the entire edge as shown.
Rounding the corners will help keep you from making gouge lines
on the surface you're scraping. Arcing an edge will give you
better bite for dry scraping.
Keep your file with you at all times. Dry scraping necessitates
resharpening as often as every half minute. Heat scraping
necessitates resharpening about every five minutes.
Use a variety of motions with your scraper - towards the guns
with the grain, away from the guns with the grain, perpendicular
to the grain, and diagonal to the grain.
Take your time and let the heat do most of the work, or
you'll end up with gouges on your wood surfaces. Clean up
all residue as you go along.
Heat assisted scraping is usually the best approach even
when just spot scraping. It's gentler on the wood and will
allow you to feather the paint as you go along.
Retire your blade as soon as it becomes a bit of a chore
to sharpen it. (You get to the thicker part of the blade
as you sharpen it.) The cost of the files and scraper
blades is small compared to the cost of struggling with
expended files and blades.
 Here is a great dry scraping tip for fast paint removal,
especially when the paint is stubbornly attached: Use the
round edge of your blade to make channels in the surface.
Space these parallel channels about 1/3 of an inch apart.
Then come back over it with the flat blade. Presto - you
can strip any thick stubborn paint with very little muscle.
The only catch is that it sometimes leaves a somewhat crude
surface. Be careful of where and how you use this technique.
6. Sinking nails
Setting nails needs to be done after heat stripping and before
sanding.
I found that I couldn't set nails for very long unless I used a
vice-grips to hold the nail set, as my fingers gave out. Better
yet, grind the ball of a ball-peen hammer into the shape of a nail
set. Then use another hammer to strike the ball-peen hammer. You
can really fly along with this method. It's been my method for
the past twenty years.
Here is a great dry scraping tip for fast paint removal,
especially when the paint is stubbornly attached: Use the
round edge of your blade to make channels in the surface.
Space these parallel channels about 1/3 of an inch apart.
Then come back over it with the flat blade. Presto - you
can strip any thick stubborn paint with very little muscle.
The only catch is that it sometimes leaves a somewhat crude
surface. Be careful of where and how you use this technique.
6. Sinking nails
Setting nails needs to be done after heat stripping and before
sanding.
I found that I couldn't set nails for very long unless I used a
vice-grips to hold the nail set, as my fingers gave out. Better
yet, grind the ball of a ball-peen hammer into the shape of a nail
set. Then use another hammer to strike the ball-peen hammer. You
can really fly along with this method. It's been my method for
the past twenty years.
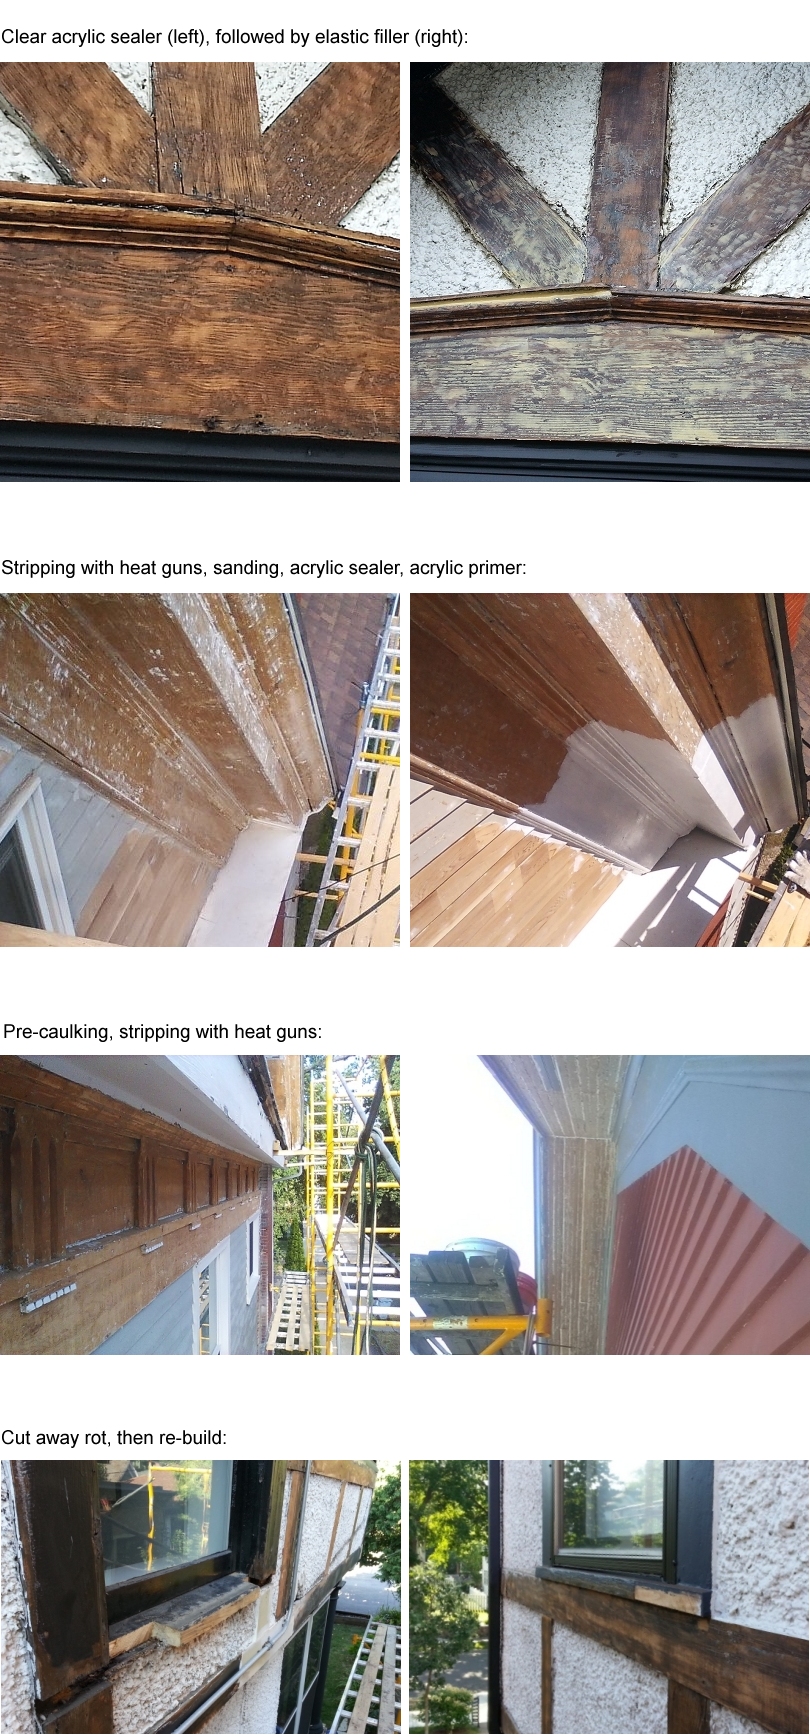
 The nail set holes are filled with a low shrinkage elastic
filler after the initial wood priming. A good general purpose
filler is clear siliconized acrylic caulk with Durabond
joint-compound powder added to greatly reduce the water content,
which in turn greatly reduces shrinkage. Two applications are
typically needed. Allow some cure time before applying any
coating over it. Be sure to use the clear caulk to
minimize its capacity to absorb moisture during its service
life.
And as long as you keep the mixture wrapped in plastic, it
will have an indefinitely long shelf life. This mixture
can also be used to fill very large cavities where you've
carved away rotted wood, sparing you many minor carpentry
tasks. Be sure to apply polyurethane caulk, such as Vulkem,
to the wood surfaces of large cavities prior to applying
the patching compound to prevent the moisture in the
patching compound to degrade the wood fibers, as the
moisture will be present for a long while when making deep
patches.
A less elastic filler is epoxy with Durabond joint compound
added. Though lacking in elasticity, this filler does have the
advantage of absorbing virtually no moisture even under extreme
conditions. This means that it won't release excessive
moisture during periods of rapid moisture evaporation through
the paint film, such as when a hot afternoon sun heats up a
dark colored topcoat. If that dark colored topcoat has much of
a sheen, it could blister where excessive moisture tries to
quickly escape. However, epoxy fillers are very time consuming
and fussy to work with. I gave that method a thorough test
on three occasions, and finally said "never again" except in
such case as noted above.
Sometimes siding boards are so dense and the nail heads so
large that setting is impractical if not impossible. In
those cases the nail heads will need a very heavy spot priming
with red iron oxide rust primer prior to applying the wood
primer. They will also need a very careful finger-wipe
caulking after the wood primer is applied, or else water will
surely enter the surface here and cause premature paint
failure.
7. Hand sanding
60 grit floor-sanding paper works well for all exterior hand
sanding tasks. Not only is it very long lasting, but it is
stiff and thus works very well on corners and narrow
surfaces. It can also be formed into a stiff rolled
shape for doing tight concave surfaces.
For a little more money, you can avoid getting slivers
(no small issue) by using sponge sanding blocks. They are
also long lasting and come in coarse, medium and fine grit.
The problematic and most frequent slivers are the ones
that go under your fingernails.
Wearing cotton gloves while sanding with the floor-sanding
paper is another means to avoid such slivers. I've become
adept at not getting under-the-fingernail slivers by virtue
of always keeping my fingers perpendicular to the sanding
motion, and have no need for gloves or sanding blocks.
If you were gentle with the scraper and let the heat do
most of the work as you heat stripped, and if you carefully
scraped off all the residue as you went along, then a good
stiff hand sanding will complete the stripping task.
Of particular importance is the rounding of the underside
of each siding board, as well as the edges of all trim boards.
A paint film is compromised by sharp edges.
Blow dust off the wood and out of nail holes with a reversed
vacuum or leaf blower before priming.
The nail set holes are filled with a low shrinkage elastic
filler after the initial wood priming. A good general purpose
filler is clear siliconized acrylic caulk with Durabond
joint-compound powder added to greatly reduce the water content,
which in turn greatly reduces shrinkage. Two applications are
typically needed. Allow some cure time before applying any
coating over it. Be sure to use the clear caulk to
minimize its capacity to absorb moisture during its service
life.
And as long as you keep the mixture wrapped in plastic, it
will have an indefinitely long shelf life. This mixture
can also be used to fill very large cavities where you've
carved away rotted wood, sparing you many minor carpentry
tasks. Be sure to apply polyurethane caulk, such as Vulkem,
to the wood surfaces of large cavities prior to applying
the patching compound to prevent the moisture in the
patching compound to degrade the wood fibers, as the
moisture will be present for a long while when making deep
patches.
A less elastic filler is epoxy with Durabond joint compound
added. Though lacking in elasticity, this filler does have the
advantage of absorbing virtually no moisture even under extreme
conditions. This means that it won't release excessive
moisture during periods of rapid moisture evaporation through
the paint film, such as when a hot afternoon sun heats up a
dark colored topcoat. If that dark colored topcoat has much of
a sheen, it could blister where excessive moisture tries to
quickly escape. However, epoxy fillers are very time consuming
and fussy to work with. I gave that method a thorough test
on three occasions, and finally said "never again" except in
such case as noted above.
Sometimes siding boards are so dense and the nail heads so
large that setting is impractical if not impossible. In
those cases the nail heads will need a very heavy spot priming
with red iron oxide rust primer prior to applying the wood
primer. They will also need a very careful finger-wipe
caulking after the wood primer is applied, or else water will
surely enter the surface here and cause premature paint
failure.
7. Hand sanding
60 grit floor-sanding paper works well for all exterior hand
sanding tasks. Not only is it very long lasting, but it is
stiff and thus works very well on corners and narrow
surfaces. It can also be formed into a stiff rolled
shape for doing tight concave surfaces.
For a little more money, you can avoid getting slivers
(no small issue) by using sponge sanding blocks. They are
also long lasting and come in coarse, medium and fine grit.
The problematic and most frequent slivers are the ones
that go under your fingernails.
Wearing cotton gloves while sanding with the floor-sanding
paper is another means to avoid such slivers. I've become
adept at not getting under-the-fingernail slivers by virtue
of always keeping my fingers perpendicular to the sanding
motion, and have no need for gloves or sanding blocks.
If you were gentle with the scraper and let the heat do
most of the work as you heat stripped, and if you carefully
scraped off all the residue as you went along, then a good
stiff hand sanding will complete the stripping task.
Of particular importance is the rounding of the underside
of each siding board, as well as the edges of all trim boards.
A paint film is compromised by sharp edges.
Blow dust off the wood and out of nail holes with a reversed
vacuum or leaf blower before priming.
Part II

The Coatings
Outline:
* A conditioning soaking coat.
* Caulking and filling.
* A primer to complete the moisture seal.
* Finish coats primarily for sunlight protection.
* Encapsulation
Overview:
Start with a thin product with good sealing properties,
heavily applied in the shade. Follow with another coat
with good sealing properties to make sure the wood always
stays relatively isolated from outside moisture. Finish
with a topcoat with good permeability (good breather).
The topcoat is more for sunlight protection than for
moisture protection.
8. The Soaker Coat
I use only clear water-borne bonding primers as my
initial wood conditioner/sealer. Oil based primers, even
when thinned out and applied heavily for maximum soak,
are not the slightest bit elastic and cannot accommodate
substrate movement, especially when the substrate is
old dry wood, broad thin lumber, poorly cut lumber,
plywood or pine.
Clear water-borne bonding primers have good penetration,
and have the additional property of being able to stabilize
old dry cracked wood. They do this by sending their three-
dimensionally elastic molecules into the pores of the wood
and by winding their way through every crack in the wood,
forming a continuous elastic barrier against water. These
primers create success where oil based primers fail.
The difference is dramatic.
(Here-after referred to as clear sealer.)
My current favorite clear sealer is one made by KILZ.
The product front label includes all the following:
KILZ KLEAR
INTERIOR|EXTERIOR PRIMER
CLEAR SEALER & BONDING PRIMER
It is a very thin product, is not expensive, and
stains the wood nicely -- indication of a strong chemical
reaction with the wood.
Be absolutely certain to flood it onto the surface,
preferably in the shade. Remember, you get only one
chance to soak the wood properly.
The KILZ clear sealer is not for use below 50 degrees
Fahrenheit. For temperatures between 35 and 50, you
could use XIM PeelBond or a mixture of three parts
XIM Peelbond to one part Sherwin Williams semi-transparent
(clear base) untinted Woodscapes. (Woodscapes provides
urethane content. Do not increase the amount of Woodscapes
in the mixture, or you could have adhesion problems
with the next coat of primer. If you plan on delaying
the next coat for more than a day during warm sunny
weather, just use straight XIM PeelBond or other
off-the-shelf clear sealer.)
Dry gray wood indicates surface rot. Sand it away, since
the wood fibers are very weak when gray and can fail,
taking the paint off with it of course.
Be sure to apply your next coat (a pigmented acrylic
primer) over the clear sealer as soon as you reasonably
can, both to ensure good adhesion and to avoid break-
down of the clear sealer from sunlight.
For surfaces that are a complex mixture of bare wood
and existing paint, making spot priming impractical,
an alkyd primer might be okay when the existing paint
is alkyd or oil base, but an acrylic primer/sealer
should be used when the existing paint is latex.
It's always a risk to apply alkyd primer or alkyd paint
over latex paint. The reasons for this are not chemical
incompatibility but rather mechanical considerations: You
don't want a coating which is a very poor breather over a
coating which is a good breather, as this can lead to
moisture buildup in the good breathing coat and ultimate
failure. You also don't want a coating with little
elasticity over a coating of high elasticity, as this can
lead to alligatoring.
9. Caulking and filling
The caulking and nail hole filling is performed next,
allowing you to apply two film forming coats over it.
The best caulk is DAP 40 year siliconized acrylic. Caulk
every little crack, tiny hole and end joint, however tight
the joint may be.
You should use a polyurethane caulk, such as Vulkem, for
high movement "architectural joints", such as where fascia
and crown moulding meet at outside corners. Allow plenty
of drying time.
This is also the point at which filling the nail holes is
performed. See section 6 (sinking nails) above.
Another excellent use for the DAP 40 year caulk is as window
glazing. I resisted this method for years because I was
proud of my traditional glazing skills. But caulk will
outlast glazing by dozens of years, will remove far more
easily should you need to replace a window pane, will save
a considerable amount of time right up front, and will have
a nice appearance once you become proficient at
applying it. It's been a frequent method of mine for many
years -- it depends on the particular project. After
applying the caulk, run your little finger along it in a
pushing manner. Be sure to prime the mullions prior to
glazing. Also be sure to razor away existing paint from
the window glass prior to priming and glazing. Use the
DAP white caulk for glazing.
10. Second coat - The Acrylic Primer
After caulking you are ready for your second coat of
primer, as the clear sealer alone is not adequate
moisture protection for the wood.
All coatings, from the initial sealer to the finish coats,
need to be elastic.
This is especially important whenever the wood has a high
degree of instability, such as in the case of old dry
cracked wood, plywood, poor cut wood, broad soft boards,
or pine.
A pigmented acrylic primer such as 1-2-3 by Zinnser
works well over the penetrating coat. This primer
will provide pretty good film build and provide both
moisture protection and the beginning of sunlight
protection. This coating needs to be applied heavily
if it's going to do its work. Be very careful to not
brush it beyond what is necessary -- it is more sensitive
to overbrushing than other acrylic products. Window sills
need an extra coat.
1-2-3 is a truly remarkable product. Its combination of
bonding, sealing, hiding and elasticity is ideal. It is
remarkably low in price and is available at all types of
stores. I don't know where I'd be without it. It is the
only acrylic primer I ever use (not counting the clear
sealers).
If there is bleeding present after the clear sealer has
been applied, a coat of 1-2-3, or in extreme cases, multiple
light coats of 1-2-3, would handle that as well. Adding
yellow oxide to 1-2-3 makes it more effective against tannin
bleeding in cedar. (The tinting base of 1-2-3 does not
provide good protection against tannin bleeding.)
11. Finish Coats
Ben Moore exterior finish coats
I use Ben Moore Element Guard Lifetime Coating or Sherwin-
Williams Duration exclusively.
These coatings are better bonding, more elastic, coatings
than previous premium acrylic coatings and are the ultimate
finish coat for exterior painting. (Duration is higher build
than Element Guard.)
(I'm currently using Element Guard, so will hereafter refer
just to that.)
Element Guard performs well down to 35 degrees. I do not rely
on it for general bare wood priming, since most situations call
for better penetration, sealing or stabilization. Disregard any
information on the label or advice you get from the paint store
regarding the use of Element Guard or any other paint as a
primer. A fully pigmented product such as house paint cannot
possibly penetrate wood cells or enhance wood fibers the way a
dedicated primer can. It is no wonder that I've seen other
painters' coatings fail when they've used Element Guard or
Duration as a wood primer.
Element Guard can be used as a two coat system over the clear
sealer, but using 1-2-3 as the next coat over the clear sealer
will provide better moisture protection, as well as bleeding
protection as mentioned above. (Also see the final paragraph
of section 10.)
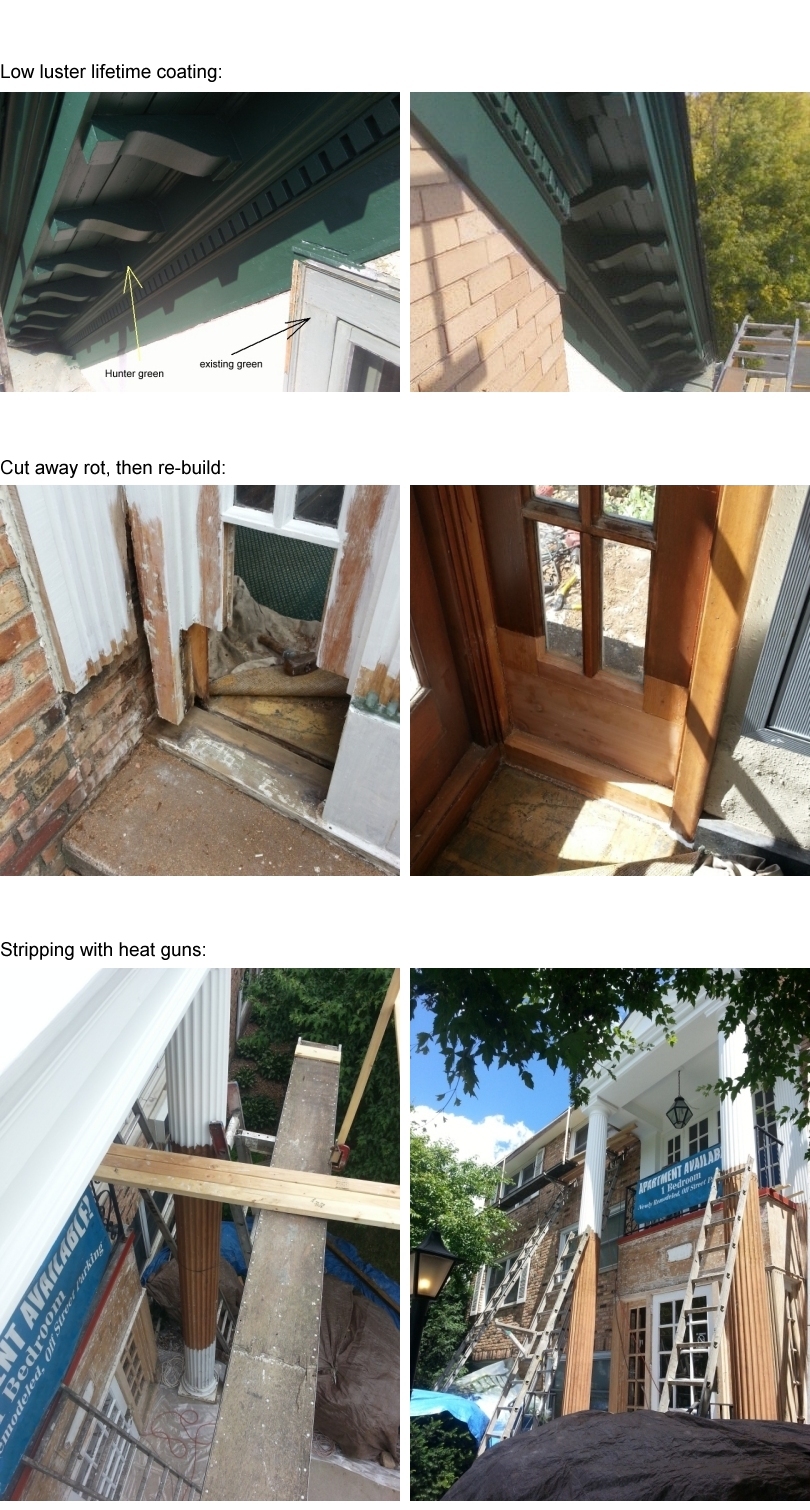
I use eggshell (low luster) acrylic paint for exteriors whenever
I can, as opposed to flat, semigloss or even satin-finish.
Eggshell finishes have just the right resin/pigment ratio to
allow the paint to both breath and shed water. Ideally, the
topcoats should breath better than the primer(s) in order to
avoid moisture trapping.
The semigloss -- and even the satin-finish -- are particularly
risky when using a dark color, as a hot afternoon sun can
cause it to blister, particularly if that hot sun was preceded
by a period of damp weather (which creates moisture buildup in
the substrate). It's unpredictable.
There is a strong tendency for people to overbrush acrylic
coatings and to spread the coating too far. One goal is
to apply a film of protection on the surface, not to
just color the surface. Another goal is to transfer the
acrylic substance from the can to the surface in a
uniform film with as little disturbance of the resin as
possible -- this is what ensures long term film service.
There should be a minimum of three coats of film-forming
product everywhere (except well shaded soffits). This
might take the form of a clear sealer followed by two coats
of Element Guard, or a clear sealer followed by 1-2-3
acrylic primer, then Element Guard.
Anything less does not adequately seal the surface.
When moisture penetrates into the wood often, the surface
wood fibers lose their integrity and the film fails at
the wood surface, ultimately as the result of hydrostatic
pressure (the pressure of water evaporation) acting on
what has become a poor bond.
Adequately sealing the surface is important even for
short term success.
A four-coat system is recommended on siding if you are
spraying. Brush on the clear sealer and 1-2-3, then
spray two coats of Element Guard, with one coat sprayed
slightly upward and the other coat sprayed slightly
downward.
Soffits require less protection. For well shaded soffits
that have only a small percentage of bare wood exposed
after scraping, you could actually get by with just a one
coat process: mix one part Penetrol or Emulsa Bond with
three parts acrylic finish coat. This gives the coating
better sealing and surface wetting properties. (Penetrol
mixes with latex paint just as well as Emulsa Bond and
provides the same long term performance. I always have
Penetrol in stock and therefore use it exclusively.)
To review: I favor the all-acrylic systems even when the
existing substrate is oil based. I rely on the clear sealer
as a whole house initial primer, over bare wood of course,
but also over chalky paint (brush or back-brush so as
to make sure the sealer penetrates the chalk all the way to
the underlying substrate) and checked paint (if sound). It
binds any residual dirt on the surface that pressure washing
leaves behind and even helps rejuvenate the surface of an old
acrylic paint film. The fact that the clear sealer is very
low in pigment allows it to bind chalk and dirt.
12. Encapsulation
Encapsulation can be regarded as stabilizing a substrate,
whether the substrate is bare wood or old paint.
Problem boards
Boards with horizontal hairline cracks as well as larger
cracks need to have a high stretch caulk (DAP 40-year)
troweled into their cracks.
There can be over a hundred such areas on a house with these
types of lumber problems, and replacing all such boards can
be cost prohibitive, especially when dealing with fascia
boards and crown molding, the very boards that most
frequently have long running cracks.
Old checked paint
This section examines the concept of layering coatings
for optimal encapsulation of old checked paint.
I use the system described below primarly in the
following areas:
The siding and trim at the first floor level on the
front of a house that is well protected by a porch
ceiling.
Low soffits and low frieze boards that are well
protected by soffits. This typically means frieze
boards on both the inside and outside of a porch.
Siding and trim at the first floor level on the north
side of a house. (North sides degrade more slowly,
and the first floor level is the most visible, being
at eye-level.)
For checked paint in other areas (more exposed to
weathering and/or less visible), I simply use a lower-
stretch paint than Element Guard.
First of all, one needs to learn to recognize the difference
between stable and unstable old paint. Generally speaking,
if the paint is not separating from the substrate or even
hinting at it, then the paint is stable, even if heavily
checked.
But checked paint can become unstable if not encapsulated
correctly:
It's desirable to use a very elastic final coat over the
checked paint, or else the checking will transmit through
it in time.
Unfortunately, a coating which is sufficiently elastic to
accomplish that might also pull the old coating loose from
the substrate through repeated expansion and contraction
with temperature changes.
Applying an oil based primer over the checked paint
prior to an elastic coating will not solve the problem,
because the elastic coating will still do work on the checked
paint by virtue of transmitting its force very effectively
through the relatively inelastic coat of new oil primer.
What to do? The secret is in using a go between coating
that is not elastic enough to flex the checked paint loose,
but elastic enough to force the elastic topcoat to do much
of its work on the go between coating. The flex force of
the elastic topcoat is largely dissipated in the go-between
coating.
I find the definition of the paint film attribute "elongation"
to be misleading: A paint film with an elongation factor
of 1 means it will stretch to 2 times its original length before
tearing. An elongation factor of 2 means it will stretch to
3 times its original length before tearing. So I use a term
called "stretch factor" to distinguish it from the industry
defined term - "elongation", even though it's the exact same
concept.
A coating with a stretch factor of 1 means that the coating
will tear upon trying to stretch it beyond its original length
of 1 unit. A coating with a stretch factor of 2 means it will
tear when stretched to double its original length.
Here are some examples among quality exterior coatings:
    Sherwin Williams Superpaint flat      1.3
    Benjamin Moore Moorlife flat          1.5
    Benjamin Moore Moorgard eggshell      1.5
    Zinsser 1-2-3 acrylic primer          1.6
    Sherwin Williams Superpaint satin     2.1
    Ben Moore Element Guard low luster    2.5
    Sherwin Williams Duration low luster  2.8
    (Low Luster = eggshell)
    These numbers are approximate values, based on averaging
    my test samples using white or light colors.

    I've had good success in long-term encapsulation using
    paint or primer with a stretch factor of between 1.3 and
    1.6 as my buffer coat, but prefer the low end of this range.
    It must be applied heavily or in two coats (1.3, then 1.6)
    to be most effective.  Start with a light coat of the clear
    sealer, especially if there is any bare wood mingled with the
    checked paint.  It's function is to seal the wood and bind
    any dust on the surface.  It's thin film will not play a role
    in the stability of the checked paint one way or the other.
    (It has a stretch factor of 1.5.)

    A light coat of Element Guard is of course my choice for the
    final coat over the buffer coat(s).

    I rarely see failure upon returning to inspect old job
    sites where this method was used.

    -----------------------------------------------------------
    When I encounter chinzy plywood veneer siding (faux
    vertical tongue & groove), with its current or future
    hairline cracks, I increase the elasticity of Element Guard
    or Duration by mixing equal parts DAP clear Dynaflex 230
    (stretch factor = 6.0) with Element Guard or Duration.  This
    yields a stretch factor of 4.3.  Anything less will not
    bridge the hairline cracks permanently.  Apply two coats,
    then finish with Element Guard or Duration.
    -----------------------------------------------------------
13. Overpainting

When paint separates from the substrate, there is always
hydrostatic pressure involved.  This is the pressure of
water evaporation.  To reduce the possibility of this occurring,
you must use coatings with a favorable ratio of adhesion to
permeability, you must apply them in the correct order, and
you must not overcoat a surface.

A heavy build up of coatings over the years can work against
you in two ways:

When the permeability of the overall coating system reaches
a certain low point, the film will separate at the weakest link,
usually at the surface of the wood, especially if the initial
primer did not penetrate deeply enough into the wood or did not
enhance the wood fibers.

Also, as the total thickness increases, the elasticity decreases,
leading to cracks in the film.

Which is the biggest problem is hard to say.

To review what was said earlier about primers and topcoats:

Start with a product with good sealing properties, heavily
applied in the shade.  Follow with another coat with
good sealing properties to make sure the wood always stays
relatively isolated from outside moisture.  Finish with a
topcoat with good permeability (good breather).  The topcoat
finalizes the moisture protection and provides sunlight
protection.

When encapsulating old paint, there is risk of creating
hydrostatic pressure beyond what the old coating can resist,
but that can sometimes be a good risk management decision,
considering the cost of paint removal.

Note:

On some projects, I've removed and reinstalled all
the siding back side out, running each piece through
a table saw to remove the paint from the bottom edge.
I hand sand or power sand the face to freshen it.  The
total time required is about the same as for stripping
with the triple heat gun as described above.  If you are
handy with a flat pry bar, you can remove all the siding
with no damage.  It's important to grind down your flat
pry bar until it is very sharp and has a very slim profile
over the first couple of inches.

Reversing the siding works only if your house has
vertical corner boards, or if you are willing to
install corner boards.  Otherwise the bevels at the
corners will be backwards.  I once converted a house
to vertical corner boards and it went very smoothly.

Mark the locations of each siding board on the adjacent
window frame or corner board prior to removal.  Scrape
the edge of the window frame or corner board clean of
paint so that you can pry off the siding boards without
binding.

Work from the top down.  Use a specialty pry bar to
extract the nails from the top two or three siding
boards.  It is smooth sailing the rest of the way.

Page updated on 08/28/2025.


contact:
roger@rogcad.com


r luebeck home page <-- back to
|